As marketers, we’re always busy planning the next campaign, thinking of what subject to choose and what our call to action should be …but sometimes we need to strip it back down to basics and see if those core, fundamental foundations are setup correctly. After all, it’s these foundations that help us build a successful marketing communication strategy,
In this post, we’ll take a look at five ways you can speed up your marcomms workflows using tools already available to you in your Vision6 account. Oh, and if you don’t yet have one – why not sign-up for a free trial today!
Tip 1: Ask the right questions upfront
Setting up for success means thinking ahead towards your end-game. In other words, if you’re looking to achieve a particular outcome, work backwards and start implementing the stepping-stones that you need to get there.
To put this into a marketing communications perspective, take the time to plan the different groups (or segments) you might need for things like personalisation and data analysis. For example, if your sign-up / subscription form only asks your contacts to provide their email address, you’re already severely limiting your open and engagement rates due to a lack of personalisation. At a bare minimum, you should be asking for the contact’s first name, but adding a couple of optional fields that will assist you with relevant segmentation options in future is always worth considering.
In the case of our example customer, XYZ Donuts, having a few more optional fields such as ‘state’ and ‘dietary’ fields will allow them to target comms to people in a particular area, show specials for the contact’s local stores, show a store map – as well as allow them to build dynamic emails that automatically show completely different content based on the contact’s dietary information. You can learn more about adding new questions (or ‘fields’) to your Vision6 forms in our Support Centre.
Email Preferences is another underutilised function. With these, your contacts can opt in and out of certain types of email communications from you. For example, they may want to receive your sales emails, but not your events content. With Email Preferences, the setup & management of dedicated segments for comms-types is a breeze. You can learn more about setting this up in Vision6 in our Support Centre.
All of these ideas are literally just a couple of extra fields (which are completely optional to the end user), but they unlock much more potential for your comms. Remember: Personalised, targeted comms results in higher opens, higher clicks and less unsubscribes. It’s so much better than blasting everyone with the same message and hoping someone clicks.
Tip 2: Build your first automation
If you only email your list on a monthly (or less frequent) basis, setting up an automation to send an email or SMS to the contact after they subscribe is a great way to start the conversation and keep your brand top-of-mind.
The email could welcome the contact & thank them for their subscription, it could offer an incentive on a certain product or in-store purchase – or even be setup to send an email with some content & useful information both one and two weeks after subscribing to keep the contact engaged until such time as you’re ready to send the next regular eNewsletter.
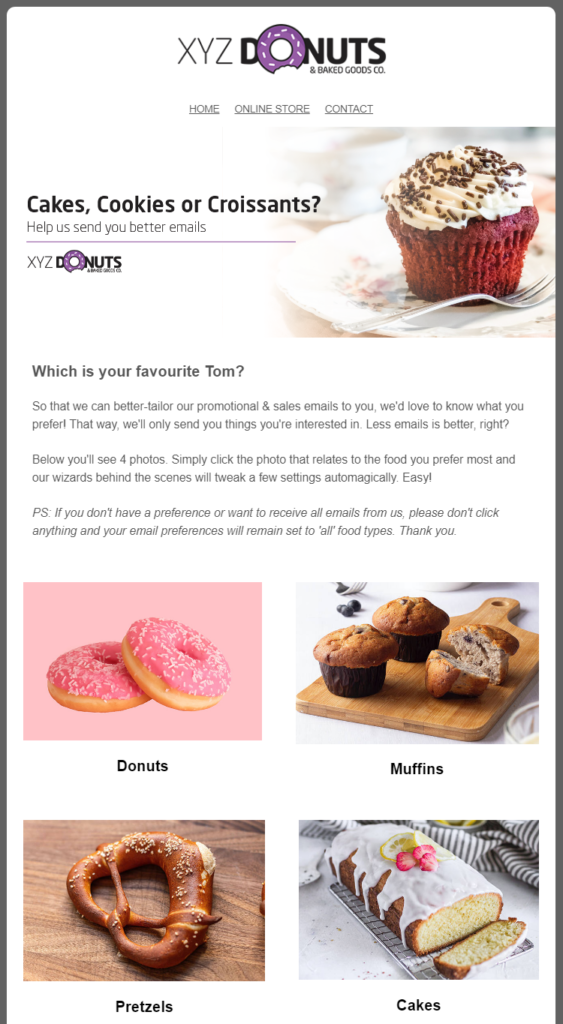
Another idea is to send an email after subscribing, asking for a little more information. This keeps the initial subscription process light-on, but the contact can optionally provide more information in order to personalise their experience going forward. Here’s a super-simple example using picture-links, but you could also link to a Vision6 form to ask for more information that way.

Knowing a little more about your contacts sets you up for many more personalisation options down the track – and automations are a fantastic way to achieve this quickly and easily.
You can read more about automation ideas in our blog post, “Improve your customer experience with this email automation how-to guide” – or jump right in and get started with your first Vision6 automation with this handy how-to guide in our Support Centre.
Tip 3: Segment your list
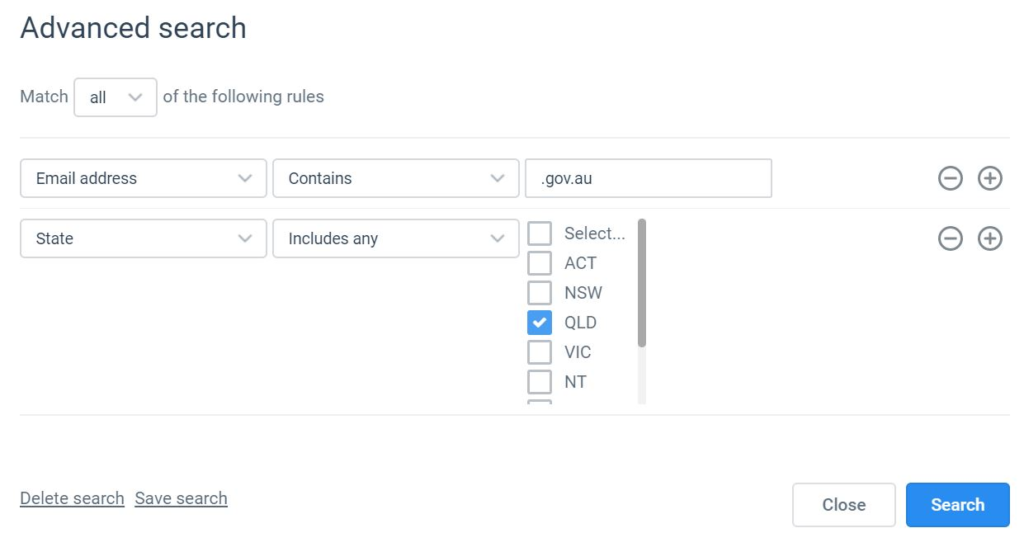
Once you’ve modified your subscription form to ask for a little more (optional) data – or built an automation to help you with this process, it’s time to segment your list. This process is super-simple, as all you need to do is ‘search’ your list for your desired segments, and save them. It’s so simple that our how-to guide for it only has 2 steps.
Now, each time you want to send an email or SMS message to a particular segment, all you need to do is pull up the segment at the time of sending & click OK! You can also use those ‘email preferences’ we mentioned earlier to help you refine and segment your contacts even further.
This saves time, means your comms are way more targeted and reduces unsubscribes.

Tip 4: Make the most of your data
Now that you’ve got extra data flowing in with your new contact subscriptions, let’s make the most of it! Use this data to your advantage to make your emails as targeted as possible.
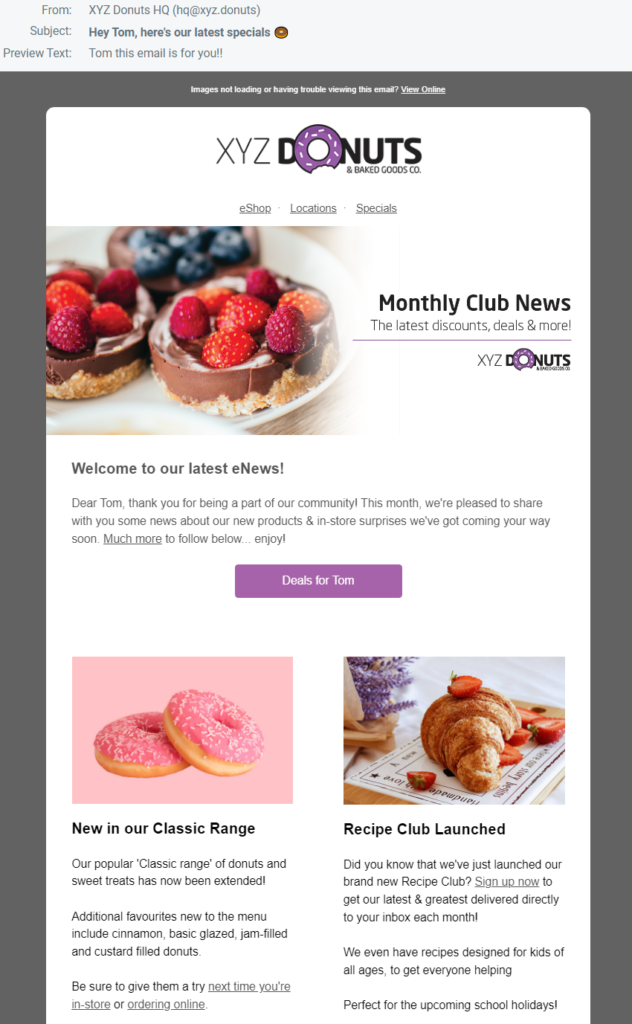
While the example email below might look pretty standard, there are three different data-points being used across seven different areas to personalise the subject, the preview text, the introduction, the button, the banner graphic and the first article – which looks and reads completely differently for a contact that it gluten intolerant than one which is not.

This use of wildcards (for personalising the content & subject with a piece of information, such as the first name), plus conditional content (changing-up the content based on other data) takes only a few moments to add, but results in a highly personalised, targeted email that is going to perform as best as it possibly can – especially when compared to a generic one that’s the same for everyone on your list!
Making use of the data available to you also means only sending the email to those who need it. Let’s say your chain of doughnut shops is looking to clear some excess gluten free stock in Queensland, why send that email to your entire list? Doing so is only going to result in unnecessary unsubscribes that could have been avoided. Be smart about your campaigns and use those segments & search filters at the time of sending to decide who needs and reads your email.
Tip 5: Teach yourself something new
This last one’s for you. After all, not everything is about pulling a lever or adjusting a dial …sometimes it’s us that needs a tweak. Times change, technology improves – so why not take some time for yourself to make sure you’re up to date with the latest and greatest in email marketing?
We’ve got a bunch of great resources (many of them completely free) to up-skill in not only Vision6, but marketing & comms in general – including free training, best practice guides and more! We’ve linked these below for you. Until next time!
- Join our 20-minute Powersessions for free topic-based training every few weeks
- New to Vision6? Attend our free weekly “Introduction to Vision6” webinar
- Free email marketing certification course
Keen to make the most of Vision6? Enquire about a personalised 1-on-1 training courses


